
Kalamunda Habilis - Part 2
from homo habilis
L. "handy man"
Summary
This short course (estimated 8 x 2 hr sessions - total of 16 hours) is for participants with limited experience with common hand tools or general domestic building repairs and construction. It carries on from "Introduction to basic tools for the novice home handyperson" first conducted in term 1, 2024 at KCLC. All the activities can be done at home without a dedicated workshop. Due to legal and safety constraints, skills associated with a licensed/registered trade (e.g. plumbing, electrical, telecommunications) will NOT be considered.
At the end of this course, participants should be able to recognise, select and use a range of common hand and power tools in a domestic setting and complete very basic repairs or installations. Previous activities will be reviewed and expanded e.g. undertake a simple woodworking project and review fixings and repairs to minor damage to structures. New activities will include: Review some more handyperson power tools such as drills, saws and sanders, Examine and assemble simple garden irrigation items and discuss "wet" construction skills such as ceramic tiling, concrete and bricklaying.
Participants to provide their own basic tools and safety gear as for first term - listed below. Materials etc. will be provided from stipulated resource fee. Participants must commit to review selected, introductory, online resources and videos prior to classes - no more than about half an hour per week. These unverified resources are from free, public sources and their producers range from interested amateurs to corporations. THEY ARE ONLY TO REVIEW TOPICS AND SHOW GENERAL IDEAS. THEY ARE NOT DEFINITIVE INSTRUCTION OR TRAINING.
Session Timetable
Session 1: Lesson: Course admin. Introduction. Overview. Safety. Review Term 1 content.
Session 2: Lesson and practical: Introduction to "wet" building skills. Define concrete mortar and plaster. Ceramic tiling concepts.
Session 3: Lesson and practical: Finish tiling activity. Intro. concrete, bricklaying etc.
Session 4: Introduction to garden reticulation: Compare "poly" and PVC pipe. Basic "poly" system repairs.
Session 5: Lesson and practical: Review basic tools. Start construction of a small woodworking project
Session 6: Lesson and practical: Continue construction of a small woodworking project.
Session 7: Lesson and practical: Continue construction of a small woodworking project. Introduction to finishes (paint, oil etc)
Sessions 8 & 9?: Complete project. if time permits consider overflow topic/s? Wrap up course
Recycling
It Is proposed to use recycled timber and other materials where possible in this course. The two main reasons are that recycling is less damaging to the environment and that new materials (esp. timber) are unreasonably expensive for training purposes.
Session 1:
Introduction/Overview
Lesson
Introduction/Overview
Lesson
- Introduction:
- Housekeeping:
- Question: What do you want to achieve? Any suggested variations to this plan?
- Session outlines: Weekly topics, activities
- Tools: Review tools and materials covered in first term course, Same tools required for this course. ADD CLEANING RAGS
- SAFETY Personal protective equipment (PPE) Possible hazards – e.g. asbestos materials, lead paint, electrical/plumbing etc.
- Bring along your plasterboard wall from last term. It is used in the tiling exercise.
Review Session 1 notes from first term
https://kalamundahabilis.weebly.com/
https://kalamundahabilis.weebly.com/
Homework/review
NOTE COMMENTS IN SUMMARY.
Watch the following Youtube videos on "wet" building skills:
Plaster, mortar or concrete?
www.youtube.com/watch?v=foKnyxPbYYs
Tiling
https://www.youtube.com/watch?v=9usbyWIhQDI
Grouting
https://www.youtube.com/watch?v=IemPfDtmNw0
Replace a broken tile
https://www.youtube.com/watch?v=ae4xdn_KqN4
Caulk gun
https://www.youtube.com/watch?v=_ijgd0Xm3Ts
Session 2:
Introduction to "wet" building skills
Lesson: Concrete, mortar and plaster. Introduction to ceramic tiling
The aim of this lesson is to acquaint you with basic principles only. It is recommended you confine your activities to minor tasks unless you undertake more extensive training and gain significant practical experience.
Define concrete, mortar and plaster
Discuss the video
www.youtube.com/watch?v=foKnyxPbYYs
Ceramic tiling
These videos only introduce tiling concepts. Discussion.
Tiling
https://www.youtube.com/watch?v=9usbyWIhQDI
Grouting
https://www.youtube.com/watch?v=IemPfDtmNw0
Replace a broken tile
https://www.youtube.com/watch?v=ae4xdn_KqN4
Caulk gun
https://www.youtube.com/watch?v=_ijgd0Xm3Ts
Bunnings advice; ceramic wall tile adhesive
https://media.prod.bunnings.com.au/api/public/content/1e6d472241e24defb0fa47f8663746e4?v=b2157673
The general gist of the advice is to use their water-based, acrylic, tile adhesive directly onto the cardboard gyprock surface. Where there is jointing or repair compound, do not glue tiles directly over this surface. Prime with their recommended primer first. It specifically says to NOT use any topping compound where tiles will go. Topping compound is a final finish plaster coat that is soft and easily sanded. It seems that its surface strength is inadequate for weight of tiles.
Activity: Practice laying tile/s
Do not start until you have seen and understood the tasks.
This activity is an ideal re-use of your wall constructed in the first course.
Under direction of the tutor:
NOTE COMMENTS IN SUMMARY.
How to mix concrete
www.youtube.com/watch?v=KNb0IbYrK8E
Concrete slab
www.youtube.com/watch?v=-NwXSkO8sBA
Watch the following Youtube videos on "wet" building skills
Angle grinder
https://www.youtube.com/watch?v=7iDQ5uiL3TI
Brickwork
www.youtube.com/watch?v=ExltDReEdno
www.youtube.com/watch?v=RbPPisveKmw
Introduction to "wet" building skills
Lesson: Concrete, mortar and plaster. Introduction to ceramic tiling
The aim of this lesson is to acquaint you with basic principles only. It is recommended you confine your activities to minor tasks unless you undertake more extensive training and gain significant practical experience.
Define concrete, mortar and plaster
Discuss the video
www.youtube.com/watch?v=foKnyxPbYYs
Ceramic tiling
These videos only introduce tiling concepts. Discussion.
Tiling
https://www.youtube.com/watch?v=9usbyWIhQDI
Grouting
https://www.youtube.com/watch?v=IemPfDtmNw0
Replace a broken tile
https://www.youtube.com/watch?v=ae4xdn_KqN4
Caulk gun
https://www.youtube.com/watch?v=_ijgd0Xm3Ts
Bunnings advice; ceramic wall tile adhesive
https://media.prod.bunnings.com.au/api/public/content/1e6d472241e24defb0fa47f8663746e4?v=b2157673
The general gist of the advice is to use their water-based, acrylic, tile adhesive directly onto the cardboard gyprock surface. Where there is jointing or repair compound, do not glue tiles directly over this surface. Prime with their recommended primer first. It specifically says to NOT use any topping compound where tiles will go. Topping compound is a final finish plaster coat that is soft and easily sanded. It seems that its surface strength is inadequate for weight of tiles.
Activity: Practice laying tile/s
Do not start until you have seen and understood the tasks.
This activity is an ideal re-use of your wall constructed in the first course.
Under direction of the tutor:
- Install your wall vertically clamped to a bench. Tile onto the undamaged area of plasterboard
- Remove dirt and dust from surface with cleaning rag
- Set/mark horizontal and vertical reference lines on the wall
- Lay tiles as directed. Damp cleaning rag/sponge will be needed to clean up
- Leave to dry in preparation for grouting
- Depending on time constraints, grout the tiles
- Tools away, clean benches, sweep floor
NOTE COMMENTS IN SUMMARY.
How to mix concrete
www.youtube.com/watch?v=KNb0IbYrK8E
Concrete slab
www.youtube.com/watch?v=-NwXSkO8sBA
Watch the following Youtube videos on "wet" building skills
Angle grinder
https://www.youtube.com/watch?v=7iDQ5uiL3TI
Brickwork
www.youtube.com/watch?v=ExltDReEdno
www.youtube.com/watch?v=RbPPisveKmw
Session 3:
Introduction to "wet" building skills- continued
Lesson: Concrete and Bricklaying
Hand mix concrete.
Discuss the video
www.youtube.com/watch?v=KNb0IbYrK8E
A general purpose, home handyperson mix ratio (by volume) would be 0.5 water, 1 cement, 2 sand, 4 aggregate.
Depending on how wet or dry the sand and aggregate are, a little more water may be required. Add SMALL amounts at a time as it is easy to overdo it and the mix can easily become too sloppy.
Some operators add a little sugar to the mix to slow down drying (e.g. in hot weather). My advice is don't do it unless you are very confident in your skills. Too much will ruin a pour and it will never set. Typically a MAXIMUM of a level teaspoon to 10kg of cement should be used!
Concrete slab
Discuss the video
www.youtube.com/watch?v=-NwXSkO8sBA
Bricklaying
Discuss the videos:
Bricklaying concepts
www.youtube.com/watch?v=ExltDReEdno
Replace a damaged brick
www.youtube.com/watch?v=RbPPisveKmw
Angle grinder
Angle grinders are versatile machines that can be used to cut and grind metal and also cut and grind masonry. Must use the correct disc for the task. Safety is paramount - they are powerful machines that can inflict serious injury if mishandled. As a minimum, eye and hearing protection. dust mask and steel capped boots.
https://www.youtube.com/watch?v=7iDQ5uiL3TI
Activity: Tile grouting etc.
Do not start until you have seen and understood the tasks.
Under direction of the tutor:
Homework/review
NOTE COMMENTS IN SUMMARY.
Watch the following Youtube videos on home garden reticulation
https://www.youtube.com/watch?v=svoiOVn78G8
https://www.youtube.com/watch?v=Cted44Lq3Iw
https://www.youtube.com/watch?v=LCXYVoUwwYM
https://www.youtube.com/watch?v=51QU9lwNWac
Watch this video on retic. solenoid valves (Note pronunciation - It is SOLenoid)
https://www.youtube.com/watch?v=CVkvrghNXJg
Watch this video on how taps work
https://www.youtube.com/watch?v=Vfi9_xhT3fQ
Introduction to "wet" building skills- continued
Lesson: Concrete and Bricklaying
Hand mix concrete.
Discuss the video
www.youtube.com/watch?v=KNb0IbYrK8E
A general purpose, home handyperson mix ratio (by volume) would be 0.5 water, 1 cement, 2 sand, 4 aggregate.
Depending on how wet or dry the sand and aggregate are, a little more water may be required. Add SMALL amounts at a time as it is easy to overdo it and the mix can easily become too sloppy.
Some operators add a little sugar to the mix to slow down drying (e.g. in hot weather). My advice is don't do it unless you are very confident in your skills. Too much will ruin a pour and it will never set. Typically a MAXIMUM of a level teaspoon to 10kg of cement should be used!
Concrete slab
Discuss the video
www.youtube.com/watch?v=-NwXSkO8sBA
Bricklaying
Discuss the videos:
Bricklaying concepts
www.youtube.com/watch?v=ExltDReEdno
Replace a damaged brick
www.youtube.com/watch?v=RbPPisveKmw
Angle grinder
Angle grinders are versatile machines that can be used to cut and grind metal and also cut and grind masonry. Must use the correct disc for the task. Safety is paramount - they are powerful machines that can inflict serious injury if mishandled. As a minimum, eye and hearing protection. dust mask and steel capped boots.
https://www.youtube.com/watch?v=7iDQ5uiL3TI
Activity: Tile grouting etc.
Do not start until you have seen and understood the tasks.
Under direction of the tutor:
- Install your tiled wall clamped to a bench
- Remove dirt and dust from surface with cleaning rag
- Working in buddy pairs, prepare a small batch of grout
- As directed, grout your tiles
- As directed, mark and drill holes into a tile
- Tools away, clean benches, sweep floor
Homework/review
NOTE COMMENTS IN SUMMARY.
Watch the following Youtube videos on home garden reticulation
https://www.youtube.com/watch?v=svoiOVn78G8
https://www.youtube.com/watch?v=Cted44Lq3Iw
https://www.youtube.com/watch?v=LCXYVoUwwYM
https://www.youtube.com/watch?v=51QU9lwNWac
Watch this video on retic. solenoid valves (Note pronunciation - It is SOLenoid)
https://www.youtube.com/watch?v=CVkvrghNXJg
Watch this video on how taps work
https://www.youtube.com/watch?v=Vfi9_xhT3fQ
Session 4:
Introduction to garden reticulation:
NOTE: For all practical activities: Strong enclosed footwear, no loose clothing and PPE as directed
Know where your mains water meter and tap are!
Usually located on the front boundary of your property (but not necessarily). Always turn off the tap immediately in the event of a major water leak and also before disconnecting any equipment directly connected to the water mains. It's a good idea to test you mains tap occasionally. Usually ignored for years, they have been known to jam up and not turn off when needed. Note the following information on how to deal with an urgent fault: https://www.watercorporation.com.au/Help-and-advice/Water-issues/Leaks/Leaking-meter
Introduction to garden reticulation:
NOTE: For all practical activities: Strong enclosed footwear, no loose clothing and PPE as directed
- Participant tool kit
- Basic Polyethylene ("poly") pipe system installation and repairs
- Basic PVC pipe system installation and repairs
Know where your mains water meter and tap are!
Usually located on the front boundary of your property (but not necessarily). Always turn off the tap immediately in the event of a major water leak and also before disconnecting any equipment directly connected to the water mains. It's a good idea to test you mains tap occasionally. Usually ignored for years, they have been known to jam up and not turn off when needed. Note the following information on how to deal with an urgent fault: https://www.watercorporation.com.au/Help-and-advice/Water-issues/Leaks/Leaking-meter

DIY Home plumbing
(https://www.commerce.wa.gov.au/sites/default/files/atoms/files/ib_160_-_plumbing_regulation_reforms_effective_immediately_0.pdf)
Plumbing regulation reforms: Stage one – 10 February 2024.
Regulation 9 amendments introduce the ability for an owner or occupier of a dwelling, or a person acting without remuneration on their behalf, to legally carry out certain basic plumbing tasks in relation to the dwelling. Such work is limited to:
• maintenance, repair or replacement of a shower head.
• maintenance or repair of a tap, other than a thermostatic mixing tap.
• replacement of a cistern washer.
• replacement of a water filter cartridge.
• clearing a blocked fixture or waste pipe by using a plunger..
Review poly pipe systems
Repair hole with joiner
https://www.youtube.com/watch?v=svoiOVn78G8
Install poly pipe reticulation
https://www.youtube.com/watch?v=LCXYVoUwwYM
https://www.youtube.com/watch?v=51QU9lwNWac
Review PVC pipe systems
Repair PVC pipe in situ
https://www.youtube.com/watch?v=Cted44Lq3Iw
Install/glue PVC pipe
https://www.youtube.com/watch?v=G1cmkTp2BUU
Activity: Assemble poly reticulation components
Do not start until you have seen and understood the tasks.
Under direction of the tutor:
- Dis/assemble and clean sprinkler head/s
- Select appropriately sized pipe and fittings
- Practice cutting pipe and joining and assembling
- On completion, dismantle and return parts to storage
- Tools away, clean benches, sweep floor.
Homework/review next lesson
Obtain your tools and equipment and watch the following Youtube videos. REMEMBER; THEY ARE ONLY INTRODUCTIONS TO TOPICS TO SHOW GENERAL IDEAS. THEY ARE NOT DEFINITIVE INSTRUCTION OR TRAINING.
Cordless drill
https://www.youtube.com/watch?v=QNzuC9pdqcU
Circular saw
https://www.youtube.com/watch?v=4jpOYxRyTFY
https://www.youtube.com/watch?v=DqfwuDq3B84
Drop saw/Mitre saw
https://www.youtube.com/watch?v=yQSeNzaa96c
Session 5:
Woodworking project
NOTE: For all practical activities: Strong enclosed footwear, no loose clothing and PPE as directed. It Is proposed to use recycled timber and other materials where possible in this course.
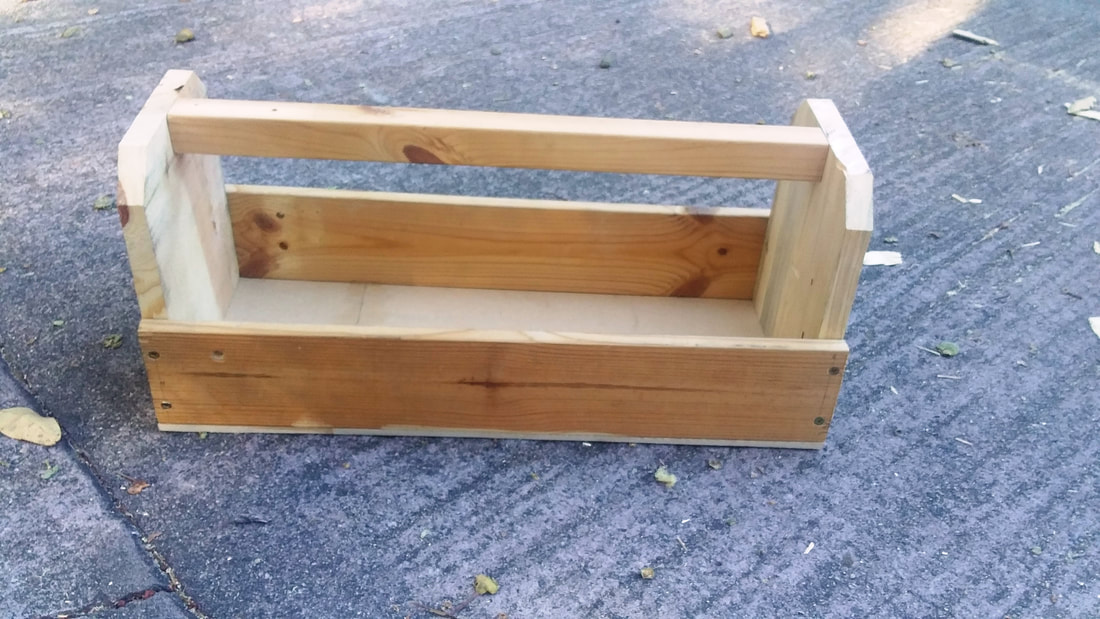
The following is an example of a project. This timber tool tray is made from pallet timber. an old bed frame and scrap MDF sheet.
Woodworking project
NOTE: For all practical activities: Strong enclosed footwear, no loose clothing and PPE as directed. It Is proposed to use recycled timber and other materials where possible in this course.
The following is an example of a project. This timber tool tray is made from pallet timber. an old bed frame and scrap MDF sheet.
Activity: Familiarisation with tools. Begin construction of woodworking project
Measuring, marking out, cutting materials and test fit parts
- Work in "buddy" pairs to assist and support each other
- You need your tool kit and PPE, the provided timber (including practice scraps) and access to a power saw (provided).
- Practice on scrap first before launching into the activity
- Mark out and cut timber
- Test fit parts to check for any errors. Correct as required.
Tutor will demonstrate and supervise. Do not start until you have seen and understood the tasks.
- Practice power sawing scrap before attempting project
- Review project
- With the aid of your square and a pencil, examine the timber, mark out and cut off, square, any damaged end/s.
- Mark out your first piece and cut it to length with a power saw. Repeat this with other pieces individually. Remember, take saw blade thickness into account. Ensure you cut on the waste side of the line.
- When all is cut out, test fit the parts to ensure they are correct
- Tools away, clean benches, sweep floor.
If time permits, review knowledge topics related to the task
Homework/review next lesson
NOTE COMMENTS IN SUMMARY.
Watch the following Youtube videos on topics related to the task
Multi-tool
https://www.youtube.com/watch?v=Cxou6yLfTaI
Sanders
https://www.youtube.com/watch?v=CjAYy0nK2Tg
Adhesives
PVA wood glue
https://www.youtube.com/watch?v=fftbphh3Swc
Painting and Repainting
https://www.youtube.com/watch?v=rNO7_a_AB8k
https://www.youtube.com/watch?v=ftDSnccAx_Q
Oiling furniture
https://www.youtube.com/watch?v=JJRPfSDlZKM
Session 6:
Continue woodworking project
NOTE: For all practical activities: Strong enclosed footwear, no loose clothing and PPE as directed
Continue woodworking project
NOTE: For all practical activities: Strong enclosed footwear, no loose clothing and PPE as directed
- Required: Your tool kit, parts etc as for session 5
Activity: Assemble woodworking project
Do not start until you have seen and understood the tasks.
Under direction of the tutor:
- Test fit parts. correct any issues before proceeding
- Consider whether you are fixing project with nails or screws. Drill pilot holes into the pieces as directed.
- If the job requires it, apply PVA glue to the first mating surfaces, even coat on both surfaces, join the surfaces and fix with nails/screws. Wipe up excess glue straight away. Repeat above with other mating surfaces, in turn.
- When project is fully assembled give it a final wipe with the damp cloth to remove any excess glue and set it aside to dry.
- Tools away, clean benches, sweep floor.
Lesson: Review sanding and finishing
Sanding
"Sand" papers come in a variety of grits and materials for different applications. See https://kalamundahabilis.weebly.com/ Session 3.
Timber is sanded "dry" and a rule of thumb is "jump" a grit in sanding stages. For example if you started with a coarse 40 grit paper to quickly strip a surface, then the next stage would use 80 grit to get rid of coarse sanding scratches, then 120 grit to progressively get a smoother finish and so on. General timber finishing would typically be in the range 150 - 220 grit. Fine timber work will be much higher.
"Wet" sanding is specialised and uses waterproof materials. The water acts as a lubricant and gives a smoother finish. Generally not applicable to woodwork. A typical application is in automotive body repairs.
Sanding by hand is OK for small areas but machine sanders are generally used for large surfaces.
Patching
A broad range of materials is available for repairs to different surfaces. review this video for a summary;
https://www.youtube.com/watch?v=7evqR61R8hM
A home-made timber patching putty can be made with some PVA glue and fine sawdust. Place a small amount of glue on a disposable surface. Slowly mix in fine sawdust of desired colour until it forms a thick paste. With a small blade pack it into the hole, level it and allow to dry (several hours, or more, depending on the depth of repair). When dry it can be sanded and then varnished or painted.
"Builder’s Bog" is a two part polyester filler similar to automotive body filler. It is ideal for filling large imperfections or rotted sections in timber but can be used to repair other materials as well. It cannot easily be colour matched so is generally painted on completion.
Finish coat
Raw wood should have a protective finish coat. Depending on the application this may be oil, varnish or paint. Some of the following notes were sourced from https://www.cutek.com.au/timber-oil-vs-stain-vs-varnish-vs-paint/
Paint protects and changes the look of timber by concealing its natural grain and colour with a coat of colour. Paint is a mixture of four basic ingredients: pigments, resins, solvents, and additives. Pigment is the color, and resin is the binder (glue). Solvent is the carrier that makes it all liquid and evaporates as the paint dries. Additives could have stain-blocking or mold-killing properties etc.
Varnish is a transparent coat similar to paint but without the pigment. Modern, tougher, Polyurethane varnishes are becoming popular.
Wood oils and waxes are designed to bring out the character in wood while offering some surface protection.
Wood stain is only designed to penetrate and change the colour of wood while leaving the grain visible. Generally finished with varnish or oil/wax.
Oil solvent vs water based paints
Oil based paints are falling out of favour and tending to be replaced by water based equivalents.
Testing for type of paint: Use a rag dipped in methylated spirit (denatured alcohol). On an unobtrusive location, rub the surface. Water based paint will rub off onto the rag. Oil based will not.
Painting over oil based paint with water based paint requires special attention: https://www.youtube.com/watch?v=rNO7_a_AB8k
LEAD PAINT SAFETY
Note: Paintwork before the 1970s probably has a high lead content. Lead is poisonous and can cause a range of long term health effects. Read the attached PDF. Click on download file to view and back when finished.
Note: Paintwork before the 1970s probably has a high lead content. Lead is poisonous and can cause a range of long term health effects. Read the attached PDF. Click on download file to view and back when finished.
| lead-paint-fifth-edition.pdf |
Painting interior walls
Review youtube video https://www.youtube.com/watch?v=ftDSnccAx_Q Note; "emulsion" is a British term for a water based interior wall paint.
Review youtube video https://www.youtube.com/watch?v=ftDSnccAx_Q Note; "emulsion" is a British term for a water based interior wall paint.
Homework/review
NOTE COMMENTS IN SUMMARY.
Review the Cutek company site on timber finishes at:
https://www.cutek.com.au/timber-oil-vs-stain-vs-varnish-vs-paint/
NOTE COMMENTS IN SUMMARY.
Review the Cutek company site on timber finishes at:
https://www.cutek.com.au/timber-oil-vs-stain-vs-varnish-vs-paint/
Session 7:
Complete woodworking project
NOTE: For all practical activities: Strong enclosed footwear, no loose clothing and PPE as directed
Complete woodworking project
NOTE: For all practical activities: Strong enclosed footwear, no loose clothing and PPE as directed
- Required tools etc: As for session 5.
Activity: Complete woodworking project
Do not start until you have seen and understood the tasks.
At this stage the main work on the project should be complete
Under direction of the tutor:
- Select appropriate sandpaper and hand sand the project to a suitable standard
- Apply selected protective coating.
- Set aside to dry
- Tools away, clean benches, sweep floor.
Session 8/9: Catch up sessions - Wrap up course
NOTE: For all practical activities: Strong enclosed footwear, no loose clothing and PPE as directed
Activity
Catch up day on unfinished work
Lesson
Some suggested overflow topics:
Jigsaw
https://www.youtube.com/watch?v=_ztM_Y_PlAo
Sanders
https://www.youtube.com/watch?v=yp28YGvZHgQ
https://www.youtube.com/watch?v=SNU-zTfOxwE
https://www.youtube.com/watch?v=A0HqlZCPyho
Multi-tool
https://www.youtube.com/watch?v=Cxou6yLfTaI
Pocket hole jig
https://www.youtube.com/watch?v=78FKsiNsWyo
https://www.youtube.com/watch?v=n0lnNlDHxWU
Simple dowel jig
https://www.youtube.com/watch?v=3ArntoBYjLY
Woodworking
Use hand chisels
https://www.youtube.com/watch?v=ooV8limCcMI
Fit gate hinges
https://www.youtube.com/watch?v=G5dQBfe4gzY
Adhesives
CA glue (superglue)
https://www.youtube.com/watch?v=EOhD96UT6lE
CA glue removal
https://www.youtube.com/watch?v=MH5vzytZa3w
https://www.youtube.com/watch?v=HOKqVo1nHr0
Hide glue (Note: USA 140 -150 F temperature = approx 70 C)
https://www.youtube.com/watch?v=Raq3pbGmmOg
Epoxy
https://www.youtube.com/watch?v=l3dHlBU5Qrs
https://www.youtube.com/watch?v=_nZfpiDBpYI
Electrical safety
Note: RCD (residual current device) and safety switch are effectively the same
https://www.youtube.com/watch?v=iguJS6hUIzQ
https://www.youtube.com/watch?v=2D1pNIxS1o0
https://www.youtube.com/watch?v=7P15X3vShDQ
https://www.commerce.wa.gov.au/building-and-energy/prohibition-type-ac-rcds
Final Activity: Socialise
NOTE: For all practical activities: Strong enclosed footwear, no loose clothing and PPE as directed
Activity
Catch up day on unfinished work
Lesson
- Review course topics and catch up, or elaborate on, topics as required.
- If time permits, overflow topics as determined by participants
Some suggested overflow topics:
Jigsaw
https://www.youtube.com/watch?v=_ztM_Y_PlAo
Sanders
https://www.youtube.com/watch?v=yp28YGvZHgQ
https://www.youtube.com/watch?v=SNU-zTfOxwE
https://www.youtube.com/watch?v=A0HqlZCPyho
Multi-tool
https://www.youtube.com/watch?v=Cxou6yLfTaI
Pocket hole jig
https://www.youtube.com/watch?v=78FKsiNsWyo
https://www.youtube.com/watch?v=n0lnNlDHxWU
Simple dowel jig
https://www.youtube.com/watch?v=3ArntoBYjLY
Woodworking
Use hand chisels
https://www.youtube.com/watch?v=ooV8limCcMI
Fit gate hinges
https://www.youtube.com/watch?v=G5dQBfe4gzY
Adhesives
CA glue (superglue)
https://www.youtube.com/watch?v=EOhD96UT6lE
CA glue removal
https://www.youtube.com/watch?v=MH5vzytZa3w
https://www.youtube.com/watch?v=HOKqVo1nHr0
Hide glue (Note: USA 140 -150 F temperature = approx 70 C)
https://www.youtube.com/watch?v=Raq3pbGmmOg
Epoxy
https://www.youtube.com/watch?v=l3dHlBU5Qrs
https://www.youtube.com/watch?v=_nZfpiDBpYI
Electrical safety
Note: RCD (residual current device) and safety switch are effectively the same
https://www.youtube.com/watch?v=iguJS6hUIzQ
https://www.youtube.com/watch?v=2D1pNIxS1o0
https://www.youtube.com/watch?v=7P15X3vShDQ
https://www.commerce.wa.gov.au/building-and-energy/prohibition-type-ac-rcds
Final Activity: Socialise
End of course
